There's one part of chess that almost every casual player skips, and it's exactly the part that gives rating points back fastest: the endgame. The reason is simple and a little sad — studying endgames feels boring. No brilliant mating attacks, no queen sacrifices, just a king and a few pawns walking slowly.
But look at the statistics. At the 1000–1500 level, about a third of games that end in a draw should have been won, and most games lost in the endgame should have been drawn. The player worked hard for 40 moves to get a one-pawn edge, then threw it away for not knowing a single concept called opposition. Learning endgames is how you claim the points you've already won.
This guide arranges endgames in the right learning order — from the most frequent and easiest to the deeper ones. Follow the order; don't jump to rook endgames before you can mate with a rook.
Why does the order matter?
Most endgame books are arranged by piece type: pawn endgames, knight endgames, bishop endgames, rook endgames, queen endgames. That's tidy for reference, but bad for learning, because a beginner will read 60 pages of pawn endgames before knowing how to mate with a rook — even though a rook mate will show up in their games this very week.
A more sensible order is by how often it appears × how costly it is not to know it:
- Basic mates (queen, rook) — appear constantly, and not knowing them = a draw from a completely won position.
- King + pawn vs king: opposition and the rule of the square — appear very often, decide win/draw.
- General endgame principles: active king, passed pawns, active rooks — used in every endgame.
- Basic rook endgames: Lucena and Philidor — the most common endgames at every level.
- Minor piece endgames — rarer, more subtle, for those already above 1500.
These five levels are covered one by one below. Levels 1–3 can be mastered in two weeks with 15 minutes of practice a day, and that's enough for almost every player below a 1400 rating.
Level 1: Basic mates you can't afford to fail
Mate with king + queen against king
This is the most common one, and the one that most often fails — not because people can't mate, but because they accidentally give stalemate: the opponent's king isn't in check but has no legal move, and the result is a draw. Thousands of won games turn into draws this way every day.
The safe method, in three stages:
- Box in with the queen, don't check. Place the queen a "knight's move" away from the enemy king (for example, enemy king on e5, queen on c4 or d3 or f3). From there the enemy king can only retreat. Keep following the same pattern until the enemy king is on the edge of the board.
- Bring your own king closer. Once the enemy king is on the edge, the queen stops moving. Your king walks over until it's two squares away (for example, enemy king on e8, your king on e6).
- Mate. The queen goes to the back rank protected by your king, or to the square in front of the enemy king guarded by your king.
Stalemate warning: when the enemy king is already in a corner (a8/h8/a1/h1), don't put the queen on a square that takes away all its moves without giving check. Before every queen move in the boxing stage, ask: "after this move, does the enemy king still have a square?" If not, and it isn't in check, that's stalemate.
Mate with king + rook against king
A little harder because the rook doesn't control diagonals, but the method can be memorized in one practice session:
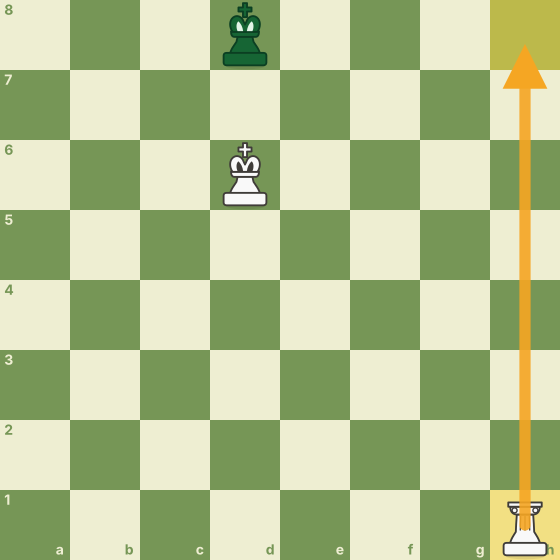
- Cut off the enemy king with the rook: put the rook on a rank or file that confines the enemy king to part of the board.
- Bring your king to face the enemy king — one square between them, on the same file or rank. This is called opposition.
- When the kings face each other, the rook checks from the side. The enemy king is forced back one rank.
- Repeat: king chases, opposition, check. Until the enemy king is on the edge. The last check is mate.
If the enemy king avoids you (won't face your king), make a waiting move with the rook — slide it one square along the same rank. The enemy king eventually has to face you or retreat.
Other mates that can wait
Mate with two bishops, and especially mate with bishop + knight, do exist — but both appear less than once in a thousand games. Learn them later, after a 1600 rating. Don't spend time on them now.
Level 2: King + pawn vs king — where the most points are lost
This endgame looks like the simplest (three pieces on the board!) but decides more results than any other. Two concepts to master: the rule of the square and opposition.
The rule of the square: can the king catch the pawn?
The situation: your opponent's passed pawn is running to its promotion square, and your king is far away. Can you make it or not? Without counting moves one by one, there's an instant way.
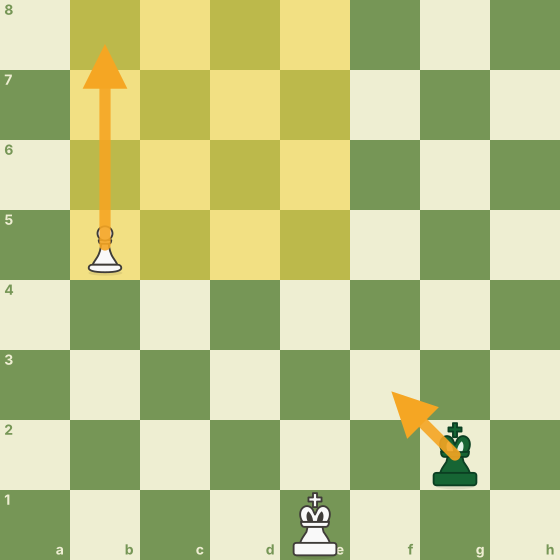
The rule: count the pawn's distance to its promotion square (for example, pawn b5 → b8 = 3 squares). Form a square with sides that long toward the enemy king. If the enemy king can step into the square on its move, the pawn gets caught. If not, the pawn promotes. One exception: a pawn still on its second rank counts as if it were on the third, because its first move may be two squares.
This rule isn't only for defending. It tells you when you can trade everything off and enter a pawn endgame confident that your pawn will promote.
Opposition: the most important concept in all endgames
When your king has to escort a pawn to promotion against an enemy king blocking the way, the result is decided by one thing: who has the opposition.
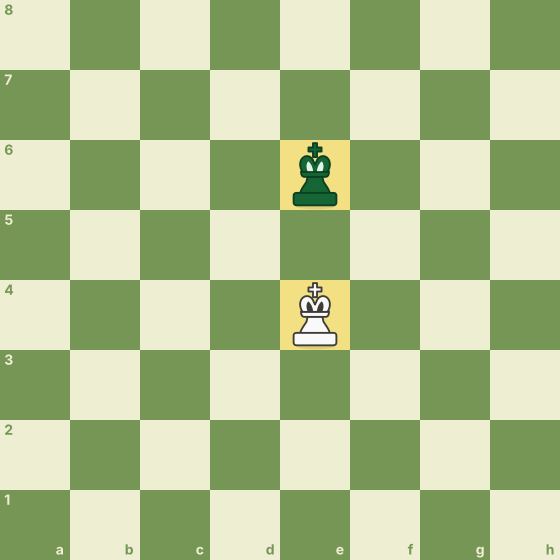
Definition: two kings facing each other with one square between them (or three, or five — called distant opposition). The side that does NOT have to move holds the opposition. Why? Because the side that must move is forced to step aside, and the enemy king can advance diagonally past it.
Practical rules for king + pawn vs king:
- The king in front of its own pawn (not behind or beside it) is the first condition. The king leads, the pawn follows.
- If your king is two ranks in front of the pawn (for example pawn e2, king e4), the position is winning regardless of whose move it is and regardless of opposition.
- If your king is one rank in front of the pawn, you win only if you hold the opposition — meaning, if it's your opponent who has to move.
- Rook pawns (a or h) are almost always drawn if the enemy king can reach the promotion corner. The king just sits in the corner and can't be driven out without stalemate.
For the defender, it's the opposite: bring your king in front of the enemy pawn, take the opposition, and once the pawn gets close, make sure your king is on the promotion square directly facing the pawn. The most important pattern: if the enemy pawn arrives on the 7th rank with check and your king can stand on the promotion square, it's a draw (stalemate or the pawn is lost).
Practice this in Play Bot by setting up the position yourself, or through the endgame classes in Courses — repeating it ten times is worth more than reading ten pages.
Level 3: General principles that apply to every endgame
After the two technical levels above, the third level is about how to think in the endgame. There's a fundamental difference from the middlegame, and players who don't adjust will play the endgame like a middlegame — and lose.
1. The king is an attacking piece. Throughout the middlegame the king is hidden. As soon as the queens are off the board, the king must head to the center and join the fight. A king in the center is worth an extra minor piece. A player whose king is still on g1 while the enemy king is already on d5 almost always loses a pawn endgame.
2. Passed pawns must be pushed — or stopped. A passed pawn is a pawn with no enemy pawn in front of it or on neighboring files that can stop it. In the endgame, a passed pawn is a permanent promotion threat. If you have one, push it with your king's support. If your opponent has one, blockade it with your king or a piece before it gets too far.
3. Rooks must be active, at any cost. A passive rook guarding a pawn from the front is almost always worse than an active rook attacking enemy pawns from behind. The often-quoted principle: rooks behind passed pawns — both your own and your opponent's.
4. Trade pieces when ahead in material, trade pawns when behind. If you're a pawn up, every piece (not pawn) exchange brings you closer to an easily won pawn endgame. If you're a pawn down, trade pawns, not pieces — the fewer pawns left, the better the drawing chances.
5. Don't rush. In the endgame, having the move is often not an advantage; sometimes it's a burden (see opposition). Before moving, ask whether there's a waiting move that improves your position without changing anything. Endgames are won by the most patient player.
Level 4: Rook endgames — Lucena and Philidor
Rook endgames are the most common endgames at every level, because rooks are usually the last pieces traded. There are two positions you need to know as well as your own name.
The Lucena position: how to win rook + pawn vs rook
The situation: you have a rook and a pawn already on the 7th rank, your king is on the promotion square (blocking your own pawn), the enemy king is cut off by at least one file by your rook, and the enemy rook harasses from behind.
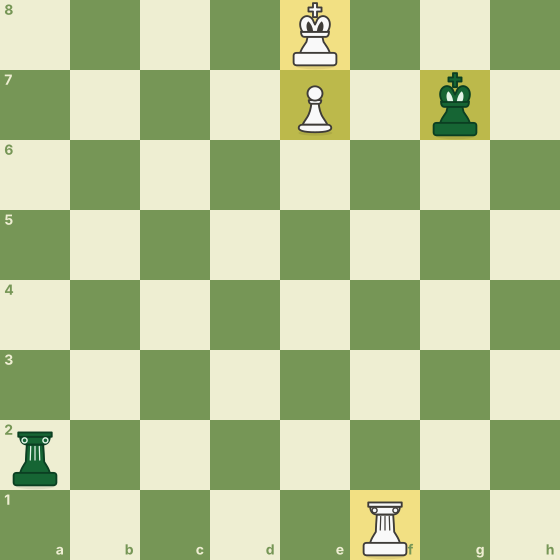
The technique is called building a bridge, from the diagram above:
- 1.Rf4 — rook to the 4th rank. This is the preparation; the bridge isn't built yet, but the material is ready. Black waits with 1...Ra1.
- 2.Kd7 — the king leaves the promotion square. Black starts harassing from behind: 2...Rd1+.
- 3.Ke6 Re1+ 4.Kd6 Rd1+ 5.Ke5 — the king zig-zags down toward its rook while dodging checks. Notice: the king always stays close to the pawn's file. Black keeps checking: 5...Re1+.
- 6.Re4 — the bridge. The rook blocks the check on the e-file while standing between the king and the enemy rook. The checks are over, and the e7 pawn promotes next move.
If you can reach the Lucena position, you win. That's why the whole rook + pawn vs rook fight for the stronger side is about how to reach Lucena.
The Philidor position: how to draw rook vs rook + pawn
The reverse: you're a pawn down in a rook endgame, and the enemy king and pawn are advancing. If your king is in front of the pawn (on the promotion square or its file), there's an almost automatic defense.
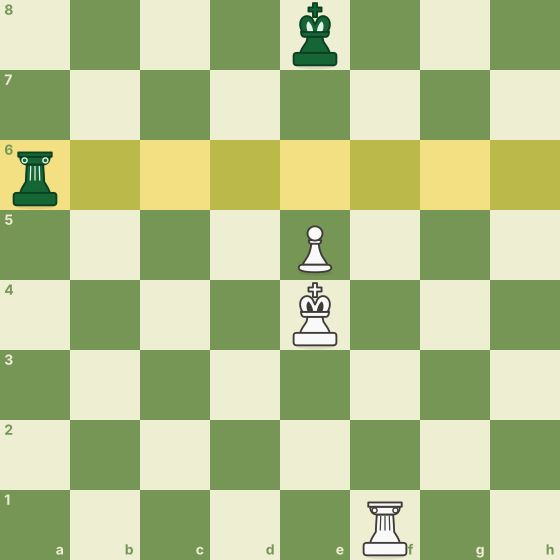
The rules:
- Rook to the 6th rank (seen from the opponent's side — the third rank from its pawn's promotion square). The enemy king can't cross that rank without the pawn's support.
- If the opponent pushes the pawn to the 6th rank to drive the rook away, the rook goes straight to the first rank (Ra1) and starts checking from behind endlessly. The enemy king has nowhere to hide because its pawn has already advanced.
- Never let the enemy king reach the 6th rank together with its pawn — that's the only way to lose.
These two positions — Lucena to win, Philidor to draw — settle the majority of rook endgames you'll meet up to an 1800 rating.
Level 5: Minor piece endgames (for those already above 1500)
Just briefly, since this guide is for beginners to intermediates. A few principles worth knowing:
- A bishop is better than a knight when pawns are spread over both wings (the bishop reaches far). A knight is better when pawns are clustered on one wing or the position is closed.
- Opposite-colored bishops (one side has a light-squared bishop, the other a dark-squared one) are very drawish, even with a one- or two-pawn difference. If you're down material, aim to trade into opposite-colored bishops.
- Pawns on your own bishop's color are bad pawns — your bishop is blocked by its own pawns. Put your pawns on the color opposite your bishop.
- A knight can't lose a tempo (it can't "wait" one move without changing square color) — a big weakness in opposition positions.
How to practice endgames effectively
Reading isn't enough — endgames are a motor skill, like riding a bike. Here's a routine that works:
- Set up the position and play it against the engine. Take positions from this guide and play as the side that should win against the strongest bot. If you can't win, repeat until you can three times in a row. Then play as the defending side.
- 15 minutes a day, one theme a week. Week 1: queen & rook mates. Week 2: opposition & the rule of the square. Week 3: Lucena & Philidor. Week 4: repeat everything.
- Review the endgames of your own games. In Katuranga's Analysis, jump to move 40 and beyond and see: does the engine mark mistakes there? Endgame errors in your own games are the lessons that stick best.
- Study endgames from master games. In Master Games, look for Capablanca's games — he's known as the cleanest endgame player in history, and his endgames are easy to follow because the technique is simple.
- Don't memorize, understand. If you know why opposition works, you can reconstruct it on the board even if you forget the details. If you only memorize, one small change in the position leaves you lost.
The most common endgame mistakes
From the patterns in Katuranga games, these are the ones that most often cost half a point or a full point:
- Stalemate while a queen up. Number one, far ahead of the rest. Before every queen move near a cornered enemy king, check whether it still has a move.
- King left in the corner. The queens are traded, but the king is still on g1 five moves later. The enemy king is already in the center.
- Pushing pawns too fast without the king. A passed pawn is pushed on its own, then eaten by the enemy king.
- Passive rooks. A rook placed behind your own pawn to "guard" it, while the enemy rook roams freely eating other pawns.
- Trading into a pawn endgame without calculating. Trading off the last rook and only then realizing the opponent holds the opposition.
Each of these mistakes can be eliminated in a week of focused practice. None of them requires talent.
Closing
The endgame is the most honest part of chess: no luck, no opening traps, just knowledge and precision. That's why it's also the part that's fastest to learn — a few hours of focused practice turn draws into wins and losses into draws, for the rest of your chess life.
Start with the basic mates this week. Opposition next week. Lucena and Philidor in the third week. After that, open your old games in Analysis and see how many half-points you used to leave on the board. That number will make sure you never underestimate the endgame again.
Frequently asked questions
Which endgame should I learn first?
Mate with king + queen and king + rook against a lone king, because both appear most often and failing them costs the most — a completely won position turns into a draw through stalemate or the 50-move rule. After that, opposition and the rule of the square in king + pawn vs king endgames.
What is opposition in chess?
Opposition is the position of two kings facing each other on the same file or rank with one square between them. The side that doesn't have to move holds the opposition, because the opponent is forced to step aside and let the king advance. This concept decides the result of most king + pawn vs king endgames.
What is the rule of the square in endgames?
A quick way to tell whether a king can catch a passed pawn without counting moves. Form a square from the pawn to its promotion square toward the enemy king; if the enemy king can step into that square on its move, the pawn gets caught, otherwise the pawn promotes.
Why are rook endgames the most important to learn?
Because rooks are usually the last pieces traded, so rook endgames are the most common type of endgame at every level. Two key positions, Lucena (to win) and Philidor (to draw), settle most rook + pawn vs rook endgames.
How long does it take to learn basic endgames?
About two to three weeks with 15 minutes of practice a day: the first week basic mates, the second week opposition and the rule of the square, the third week Lucena and Philidor. The key is practicing the positions repeatedly against an engine, not just reading.
Read also
Cara Jadi Grandmaster Catur: Tangga Gelar FIDE, Syarat Norma, dan Berapa Lama Sebenarnya
Penjelasan lengkap tangga gelar catur resmi — CM, FM, IM, GM dan gelar putri — syarat rating dan norma, cara turnamen dihitung, berapa lama jalannya, serta jalur realistis untuk pemain Indonesia yang mulai dari nol.
Kenapa Kamu Selalu Kalah Main Catur? 8 Penyebab Paling Umum (dan Obatnya)
Bukan karena kamu bodoh, bukan karena lawan pakai mesin. Delapan penyebab kekalahan yang benar-benar sering terjadi di catur amatir — bidak gantung, buru-buru, main terlalu banyak, sampai kebiasaan menyalahkan koneksi — lengkap dengan obat yang bisa dicoba hari ini.
Aplikasi Catur Online Gratis Terbaik 2026: Cara Memilih yang Cocok untuk Kamu
Bingung memilih aplikasi catur? Panduan jujur soal apa yang benar-benar perlu kamu lihat — lawan yang setara, analisis, teka-teki, ukuran aplikasi, kuota internet, dan mana yang benar-benar gratis. Termasuk daftar periksa sebelum kamu memasang apa pun.
Try it on the board
Reading alone doesn't raise your rating. Play one game against a bot, then review it — Katuranga marks your brilliant moves, mistakes, and blunders with Stockfish.